Shooting Table plans

Jon E-- That's a good set of plans. Thanks for the link! I am sure it will be very useful to many shooters looking to build a table.

I built a table similar to that, only I used two pieces of 3/4" plywood for a total top thickness of about 1 1/2". Instead of the oak wedges for the legs, I used coupler fittings, cut them at the angle I needed and welded them onto plates of metal for the three legs. Then I drilled holes completely through the top and used carriage bolts to fasten the metal plates to the table top with the nuts going on the bottom edge of the table. It is a VERY HEAVY, stable table on just about any kind of ground. Not a table you want to be lugging around a prairie dog town on a walk-about!!!
 
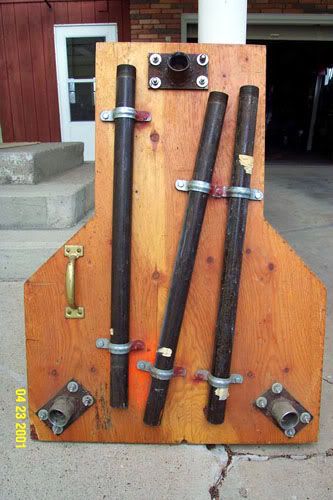
I just built a table using these plans as a model. I had to make some changes because the wood screws suggested for holding the flanges to the table bottom is a POOR idea. No way a couple of wood screws are gonna hold up for the long term, it's a bad idea.

Instead, I drilled all the way thru and used carriage bolts for a MUCH stronger hold. Also, the wedges are pretty difficult to cut by hand and they came out rough. I ended up using Bondo as a skim coat to smooth the cut side of the wedges for a perfectly flat surface. If I were to do it again, I'd make the wedges a little thicker to increase the angle a bit. A good table saw and a jig would make this job easier.

I used one sheet of 3/4" wood, and the table is pretty steady, but it does flex a little under pressure. Using two layers of plywood would make this table indestructable. Also, you might want to cut an oval hole in the side of the table for a carry handle. It's heavy.

You may want to play around with the location of the table legs before you do anything permanent. Maybe clamp them on first and try it out for balance. I got mine close, but I wish one of the legs was moved over a few inches for better ballance on the front end of the table. It's "good" enough so I'll leave it alone.

Other than that, it's a good solid table. I spent about $85 on materials.

$20 - Wood for table top, wedges
$25 - Floor flanges, end caps, hardware
$18 - Pipe cut and threaded at Home Depot
$7 - Primer quart, tinted to match paint
$8 - Paint
$3 - Sand paper
$5 - Rustolium aerosal for legs.

I originally used folding table legs, but the table was not steady at all, there was always a wobble going on. I took them off. The tripod legs work much better and are 1000 times stronger. Good luck!
 
Keith,
I make a similar one. I used 5ply plywood and make the legs 36" as I am tall (6'4"). You can always cut the legs off and rethread them if they are too tall.
 
I'm 6'4" and my table legs are 30" cut. Don't forget that the legs don't screw all the way in, so you gain about an inch at the top. Plus, I used screw-on end caps for the bottoms which adds another inch or two. You only tighten the legs a few turns before it tightens up, so you actually gain length to the legs. So far, the table is comfortable for me, it's not too low. Another inch or two higher would be fine too. My table top is exactly 32.25 inches high with 3/4" wood and 30" legs.

If you can cut and weld the couplings onto a steel plate like that second link shows, that's the best way to do it. Cutting the wedges sucks.

I don't have access to welding or cutting tools, so I used the floor flanges from Home Depot and made the wood wedges instead. The problem with that is that the carriage bolt heads don't go straight down into the wood, they angle down. That means they're not going to lie flat on the surface and you have to recess them a little further if you don't want them to stick up above the table surface. Mine do a little, it's not a big deal. I was afraid I'd loose strength if I recessed too far into the 3/4" table top.

I'll see if I can post a pic on Thurs.

Anybody have any good ideas for a seat? I have one of those portable camping chairs, but I sink too far down in it to be comfortable while shooting.
 
Stiff neck, I'm like you not being a welder. I like the leg idea from the first set of plans, but like the table top better from the second set of plans. /ubbthreads/images/graemlins/laugh.gif
 
Here's how mine turned out.
t3a.jpg

t1.jpg

t3.jpg

t4.jpg

t5.jpg

I used latex paint instead of a clear varnish. The table top is going to get beat up from field use and transportation over time. Adding a new coat of latex paint once a year is much easier than trying to fix a clear coat that is dented, scratched, etc. The legs already have some marks on them from rolling around in my trunk, but it's just flat Rustolium spray paint.
 
Very Nice Stiff Neck, The pitch blocks are a great solution. Have you considered mounting 6 of the metal clips, (used for hanging shovels on the garage wall) on the bottom of the table, to make the legs self-storing? Maybe even add removable back pack straps?
 
Yeah, those clips are on my short list of things to buy at the hardware store. Hadn't thought about carrying straps, although I did consider cutting out carry handle.
 
Here's a photo of my 3-legged shooting bench. I used some conduit clamps to hold the 3 pieces of pipe for the legs on the bottom of the table for transport. I also placed a handle on the bottom to help carry it. The two pieces of 3/4 inch plywood and the pipe and fittings make it a realy heavy weight to carry. The table is 3 feet long by 2 feet 3 inches wide and is cut in the back so either a righty or a lefty can use it. I built this table many, many years ago. The plywood cost $9.44, the pipe, $5.25, the couplings set me back $4.68, the metal I welded them onto was some stuff I had laying around, and the carriage bolts and nuts cost $1.44. That's not counting anything for the welding rods used to weld the couplings onto the metal plates. /ubbthreads/images/graemlins/laugh.gif Total cost of the table = $20.81.

Bench_in_transport_mode--small.jpg


Here is the table with the legs turned in place ready to turn over and use.

Bottom_bench_legs_inserted.jpg


I used to haul this table out to the range and use it as a cleaning table as illustrated in the photo below. Now, I just point the front of my pickup into the wind, set my rifle vise up on the tailgate of my pickup, and clean my rifles there when I am at the range. The black tube on the far right side of the table is not a 4th leg. It is a tube that I use to tansport my cleaning rods in.

Bench_in_use--small.jpg


When you get this table set up in one place, it takes an earthquake to move it!!! Solid as a rock. Right now, I have it set up in my reloading room and use it to hold my rifle vise when I clean barrels, mount scopes, etc.
 
stiff neck-- Yep, that table was built a loooooooooooong time ago, like I typed in my message:

I built this table many, many years ago.
and I probably should have typed: I built this table many, many, many, many, many years ago. /ubbthreads/images/graemlins/laugh.gif /ubbthreads/images/graemlins/laugh.gif /ubbthreads/images/graemlins/laugh.gif
 
1 thing i did with mine was to put some indoor/outdoor carpet on it stapled underneath, and it keeps all the round shooting thingees from rolling off.
 
I just built a table myself. It wasn't cheap, but I had such a wide range of requirements that I needed to build it myself. I had to design it such that it was sturdy enough to hold my fat arse (6'2", 320), and since my friends and family would be using it as well it needed to be fully adjustable, comfortable, ambidextrous, and assemble easily. Portability wasn't an issue, the top just had to fit between the wheel wells in the truck bed. Sorry about the size of the picture, I didn't resize it enough.
EDIT: picture was so big that I'll just post a link for it instead.
http://myweb.cableone.net/abraden/images/Hunting/Completed_Table.jpg

The finished product is all of the above requirements. It sets up in about 5 minutes, and the steel pieces bundle together into one 50lb bundle, with the exception of the main base. It is completely adjustable so it can go from being perfect for me to shoot, to being reset for a 6 year old to shoot easily.


Write your reply...
Back
Top