
REBEL OFFROAD
New member
http://axialracing.com/wordpress/2012/03/19/axial-2012-jeep-wrangler-rubicon-unlimited/
Rebels,
We are VERY excited about this project. We've been keeping it under our hats for some time - and details still cannot be shared in full. Stay tuned to this thread and the Official Axial Blog!

Originally Posted By: Official Axial Blog
Last week we were talking about Jeff Johns and his search of the best trail rig for his needs, see previous blog post here. The strongest argument going was the idea of building a full size Honcho, which would be really cool! We could model the bed and cage exactly like our 1/10 Honcho and hit the trail with a full size SCX10 Honcho. This was dismissed rather quickly by Jeff as he stood and pronounced three statements, #1. He is a “Jeep” guy, and #2. He needed room to take his family out for adventures, and the Honcho style of vehicle just wouldn’t provide the space, and #3. He is a “Jeep” guy. Due to the fact that most of the other employees involved in this conversation were also proud Jeep owners, Jeff was leaning toward a new Jeep, but which one and why?
This is quite often the topic at the office, not necessarily about Jeeps, but about the different wheelbase that is best to use for trail driving with the SCX10 Dingo at 11.4″ and the Honcho’s wheelbase at 12.3″. Not even a full inch separating the two and they drive very differently and the same can be said in the full size arena as well. The Jeep options on the table were the Wrangler and Wrangler Unlimited. Both platforms were very capable vehicles, especially once they are prepared for battle. The shorter wheelbase Wrangler offers a tighter turning radius and better break over angles like the Dingo SCX10, but Jeff just parted ways with a standard Wrangler and it provided very limited space for his family and gear. The longer Wheelbase Wrangler Unlimited offers more interior space and better handling over the bumps and steeper climbs like the Honcho, so the Jeep Wrangler Unlimited really seemed to fit the bill.
With both options on the table, Jeff and Axial crew headed down the road to meet with Bond at Rebel Off-Road. Bond is the local go to guy for Jeep preparation and maintenance. He has vast knowledge about everything Jeep Wrangler Rubicon and is very well known for his extensive jeep builds as well as his experience on the trail. We didn’t even get half way through our question before he blurted out “Get a 2012 Wrangler Unlimited Rubicon, it is an improvement over what is already the most popular and capable off-road vehicle on the road, the 2011 model”. He proceeded to show us several vehicles he had built for customers including his own Wrangler Unlimited. The popularity of the Wrangler Unlimited meant that there are a ton of options on the market personalize the rig for its intended purpose. It was settled, Jeff would secure a 2012 Jeep Wrangler Unlimited Rubicon.
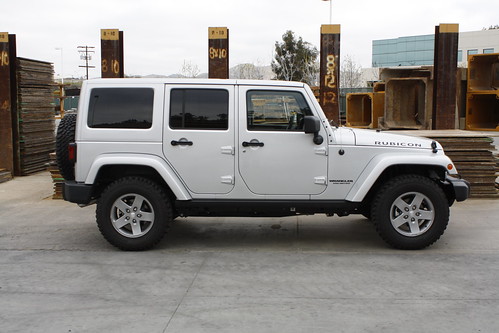
Fast forward one week and Jeff has secured his 2012 Jeep Wrangler Unlimited. He chose the silver Rubicon model. The 2012 Jeep has a more powerful engine, better fuel economy than previous models and is pretty well ready for some trail action right off the dealership floor. The Rubicon features the Rock-Trak 4WD system, an electronic sway bar disconnect, Tru-Lok locking diffs in Dana 44 axles.
Here are a few shots of the new rig…. Let’s call it the Axial SCX10JK!


Originally Posted By: Official Axial Blog
Keep checking back for more info as we get ready to put this 2012 Jeep Wrangler Rubicon Unlimited under the knife at Rebel Off-Road!
Rebels,
We are VERY excited about this project. We've been keeping it under our hats for some time - and details still cannot be shared in full. Stay tuned to this thread and the Official Axial Blog!
Originally Posted By: Official Axial Blog
Last week we were talking about Jeff Johns and his search of the best trail rig for his needs, see previous blog post here. The strongest argument going was the idea of building a full size Honcho, which would be really cool! We could model the bed and cage exactly like our 1/10 Honcho and hit the trail with a full size SCX10 Honcho. This was dismissed rather quickly by Jeff as he stood and pronounced three statements, #1. He is a “Jeep” guy, and #2. He needed room to take his family out for adventures, and the Honcho style of vehicle just wouldn’t provide the space, and #3. He is a “Jeep” guy. Due to the fact that most of the other employees involved in this conversation were also proud Jeep owners, Jeff was leaning toward a new Jeep, but which one and why?
This is quite often the topic at the office, not necessarily about Jeeps, but about the different wheelbase that is best to use for trail driving with the SCX10 Dingo at 11.4″ and the Honcho’s wheelbase at 12.3″. Not even a full inch separating the two and they drive very differently and the same can be said in the full size arena as well. The Jeep options on the table were the Wrangler and Wrangler Unlimited. Both platforms were very capable vehicles, especially once they are prepared for battle. The shorter wheelbase Wrangler offers a tighter turning radius and better break over angles like the Dingo SCX10, but Jeff just parted ways with a standard Wrangler and it provided very limited space for his family and gear. The longer Wheelbase Wrangler Unlimited offers more interior space and better handling over the bumps and steeper climbs like the Honcho, so the Jeep Wrangler Unlimited really seemed to fit the bill.
With both options on the table, Jeff and Axial crew headed down the road to meet with Bond at Rebel Off-Road. Bond is the local go to guy for Jeep preparation and maintenance. He has vast knowledge about everything Jeep Wrangler Rubicon and is very well known for his extensive jeep builds as well as his experience on the trail. We didn’t even get half way through our question before he blurted out “Get a 2012 Wrangler Unlimited Rubicon, it is an improvement over what is already the most popular and capable off-road vehicle on the road, the 2011 model”. He proceeded to show us several vehicles he had built for customers including his own Wrangler Unlimited. The popularity of the Wrangler Unlimited meant that there are a ton of options on the market personalize the rig for its intended purpose. It was settled, Jeff would secure a 2012 Jeep Wrangler Unlimited Rubicon.
Fast forward one week and Jeff has secured his 2012 Jeep Wrangler Unlimited. He chose the silver Rubicon model. The 2012 Jeep has a more powerful engine, better fuel economy than previous models and is pretty well ready for some trail action right off the dealership floor. The Rubicon features the Rock-Trak 4WD system, an electronic sway bar disconnect, Tru-Lok locking diffs in Dana 44 axles.
Here are a few shots of the new rig…. Let’s call it the Axial SCX10JK!
Originally Posted By: Official Axial Blog
Keep checking back for more info as we get ready to put this 2012 Jeep Wrangler Rubicon Unlimited under the knife at Rebel Off-Road!


![url]](http://[url=http://farm8.staticflickr.com/7177/6988319635_871532ed38.jpg t=_blank]http://farm8.staticflickr.com/7177/6988319635_871532ed38.jpg[/url])
![url]](http://[url=http://farm8.staticflickr.com/7052/6988173745_8e7189028a.jpg t=_blank]http://farm8.staticflickr.com/7052/6988173745_8e7189028a.jpg[/url])
![url]](http://[url=http://farm8.staticflickr.com/7062/6988171411_3a39104ed0_z.jpg t=_blank]http://farm8.staticflickr.com/7062/6988171411_3a39104ed0_z.jpg[/url])
![url]](http://[url=http://farm8.staticflickr.com/7192/6988165125_3864e1fa5a.jpg t=_blank]http://farm8.staticflickr.com/7192/6988165125_3864e1fa5a.jpg[/url])
![url]](http://[url=http://farm8.staticflickr.com/7206/6842235554_07dcf8a5f4_z.jpg t=_blank]http://farm8.staticflickr.com/7206/6842235554_07dcf8a5f4_z.jpg[/url])
![url]](http://[url=http://farm8.staticflickr.com/7182/6842232020_1cc32ac25e.jpg t=_blank]http://farm8.staticflickr.com/7182/6842232020_1cc32ac25e.jpg[/url])
![url]](http://[url=http://farm8.staticflickr.com/7187/6842187040_0e28dc8950.jpg t=_blank]http://farm8.staticflickr.com/7187/6842187040_0e28dc8950.jpg[/url])
![url]](http://[url=http://farm8.staticflickr.com/7188/6842101524_76c4e85870.jpg t=_blank]http://farm8.staticflickr.com/7188/6842101524_76c4e85870.jpg[/url])
![url]](http://[url=http://farm8.staticflickr.com/7193/6988156581_2aaa15184d.jpg t=_blank]http://farm8.staticflickr.com/7193/6988156581_2aaa15184d.jpg[/url])
![url]](http://[url=http://farm8.staticflickr.com/7056/6842088054_232f4609f0.jpg t=_blank]http://farm8.staticflickr.com/7056/6842088054_232f4609f0.jpg[/url])
![url]](http://[url=http://farm8.staticflickr.com/7036/6842123648_86150011d5.jpg t=_blank]http://farm8.staticflickr.com/7036/6842123648_86150011d5.jpg[/url])
![url]](http://[url=http://farm8.staticflickr.com/7188/6988238291_6398790a9d.jpg t=_blank]http://farm8.staticflickr.com/7188/6988238291_6398790a9d.jpg[/url])
![url]](http://[url=http://farm8.staticflickr.com/7178/6988269601_e025dc8bae.jpg t=_blank]http://farm8.staticflickr.com/7178/6988269601_e025dc8bae.jpg[/url])
![url]](http://[url=http://farm8.staticflickr.com/7195/6988261547_828f451588.jpg t=_blank]http://farm8.staticflickr.com/7195/6988261547_828f451588.jpg[/url])
![url]](http://[url=http://farm8.staticflickr.com/7043/6842173684_878eb5ac9d.jpg t=_blank]http://farm8.staticflickr.com/7043/6842173684_878eb5ac9d.jpg[/url])
![url]](http://[url=http://farm8.staticflickr.com/7060/6988292023_a38ed0216b.jpg t=_blank]http://farm8.staticflickr.com/7060/6988292023_a38ed0216b.jpg[/url])
![url]](http://[url=http://farm8.staticflickr.com/7201/6988205907_00c21ddc58.jpg t=_blank]http://farm8.staticflickr.com/7201/6988205907_00c21ddc58.jpg[/url])
![url]](http://[url=http://farm8.staticflickr.com/7070/6988367495_de792913ab.jpg t=_blank]http://farm8.staticflickr.com/7070/6988367495_de792913ab.jpg[/url])
![url]](http://[url=http://farm8.staticflickr.com/7043/6842254588_0766e7d000.jpg t=_blank]http://farm8.staticflickr.com/7043/6842254588_0766e7d000.jpg[/url])
![url]](http://[url=http://farm8.staticflickr.com/7039/6842266434_13c2b56420_z.jpg t=_blank]http://farm8.staticflickr.com/7039/6842266434_13c2b56420_z.jpg[/url])
![url]](http://[url=http://farm8.staticflickr.com/7040/6842262650_9a902e18ca.jpg t=_blank]http://farm8.staticflickr.com/7040/6842262650_9a902e18ca.jpg[/url])


![url]](http://[url=http://farm8.staticflickr.com/7209/7021606327_7b9f20b76a.jpg t=_blank]http://farm8.staticflickr.com/7209/7021606327_7b9f20b76a.jpg[/url])
![url]](http://[url=http://farm8.staticflickr.com/7262/7021607861_b8da313ee1.jpg t=_blank]http://farm8.staticflickr.com/7262/7021607861_b8da313ee1.jpg[/url])
![url]](http://[url=http://farm8.staticflickr.com/7259/7021600669_7b1762e7f2.jpg t=_blank]http://farm8.staticflickr.com/7259/7021600669_7b1762e7f2.jpg[/url])
![url]](http://[url=http://farm8.staticflickr.com/7189/7021588875_3e17cc2f7e.jpg t=_blank]http://farm8.staticflickr.com/7189/7021588875_3e17cc2f7e.jpg[/url])
![url]](http://[url=http://farm8.staticflickr.com/7229/6875494112_2e33e517b3.jpg t=_blank]http://farm8.staticflickr.com/7229/6875494112_2e33e517b3.jpg[/url])
![url]](http://[url=http://farm8.staticflickr.com/7048/6842394212_bd51565af1_z.jpg t=_blank]http://farm8.staticflickr.com/7048/6842394212_bd51565af1_z.jpg[/url])
![url]](http://[url=http://farm8.staticflickr.com/7188/6842389758_cba5462b7e.jpg t=_blank]http://farm8.staticflickr.com/7188/6842389758_cba5462b7e.jpg[/url])
![url]](http://[url=http://farm8.staticflickr.com/7180/6842411062_42979950b6.jpg t=_blank]http://farm8.staticflickr.com/7180/6842411062_42979950b6.jpg[/url])
![url]](http://[url=http://farm8.staticflickr.com/7056/6988518919_9bb95755cf.jpg t=_blank]http://farm8.staticflickr.com/7056/6988518919_9bb95755cf.jpg[/url])
![url]](http://[url=http://farm8.staticflickr.com/7064/6988521663_b2c90af2fd.jpg t=_blank]http://farm8.staticflickr.com/7064/6988521663_b2c90af2fd.jpg[/url])
![url]](http://[url=http://farm8.staticflickr.com/7045/6988511503_cccdbd5f09.jpg t=_blank]http://farm8.staticflickr.com/7045/6988511503_cccdbd5f09.jpg[/url])
![url]](http://[url=http://farm8.staticflickr.com/7068/6842406398_e7eae1af59.jpg t=_blank]http://farm8.staticflickr.com/7068/6842406398_e7eae1af59.jpg[/url])
![url]](http://[url=http://farm8.staticflickr.com/7187/6988527599_6016e9302f.jpg t=_blank]http://farm8.staticflickr.com/7187/6988527599_6016e9302f.jpg[/url])
![url]](http://[url=http://farm8.staticflickr.com/7055/6988531881_9652bd2991.jpg t=_blank]http://farm8.staticflickr.com/7055/6988531881_9652bd2991.jpg[/url])
![url]](http://[url=http://farm8.staticflickr.com/7064/6988508763_6be065dba3.jpg t=_blank]http://farm8.staticflickr.com/7064/6988508763_6be065dba3.jpg[/url])
![url]](http://[url=http://farm8.staticflickr.com/7054/6842401966_668956d35b.jpg t=_blank]http://farm8.staticflickr.com/7054/6842401966_668956d35b.jpg[/url])
![url]](http://[url=http://farm8.staticflickr.com/7060/6842421944_ed41deb3f7.jpg t=_blank]http://farm8.staticflickr.com/7060/6842421944_ed41deb3f7.jpg[/url])
![url]](http://[url=http://farm8.staticflickr.com/7059/6842423970_447677a9ec.jpg t=_blank]http://farm8.staticflickr.com/7059/6842423970_447677a9ec.jpg[/url])
![url]](http://[url=http://farm8.staticflickr.com/7195/6988549451_e714c9dff3.jpg t=_blank]http://farm8.staticflickr.com/7195/6988549451_e714c9dff3.jpg[/url])
![url]](http://[url=http://farm8.staticflickr.com/7192/6988552747_486bf436ec.jpg t=_blank]http://farm8.staticflickr.com/7192/6988552747_486bf436ec.jpg[/url])
![url]](http://[url=http://farm8.staticflickr.com/7226/6875514518_4e9f072988.jpg t=_blank]http://farm8.staticflickr.com/7226/6875514518_4e9f072988.jpg[/url])


![url]](http://[url=http://farm7.staticflickr.com/6223/6876359442_69138df57f.jpg t=_blank]http://farm7.staticflickr.com/6223/6876359442_69138df57f.jpg[/url])
![url]](http://[url=http://farm7.staticflickr.com/6114/6876367390_2626a089c6.jpg t=_blank]http://farm7.staticflickr.com/6114/6876367390_2626a089c6.jpg[/url])
![url]](http://[url=http://farm7.staticflickr.com/6223/7022475321_8e9e95ba21.jpg t=_blank]http://farm7.staticflickr.com/6223/7022475321_8e9e95ba21.jpg[/url])
![url]](http://[url=http://farm8.staticflickr.com/7216/7022479107_704ea10494.jpg t=_blank]http://farm8.staticflickr.com/7216/7022479107_704ea10494.jpg[/url])
![url]](http://[url=http://farm8.staticflickr.com/7180/6876370250_8baac49c5c_z.jpg t=_blank]http://farm8.staticflickr.com/7180/6876370250_8baac49c5c_z.jpg[/url])