TCRay
New member
I started a post the other day called "Camo Dip Kit - Beware" that is in this section. I wasted $114.00 on the Camo Dip Kit.
So, I came across a good Youtube video, , that shows how to simply camo your gun.
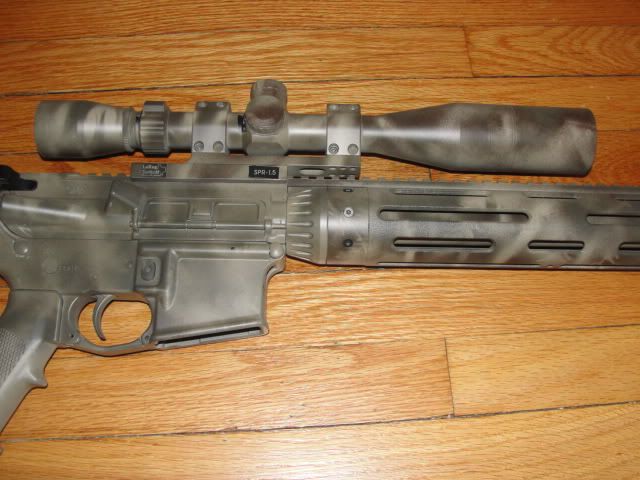
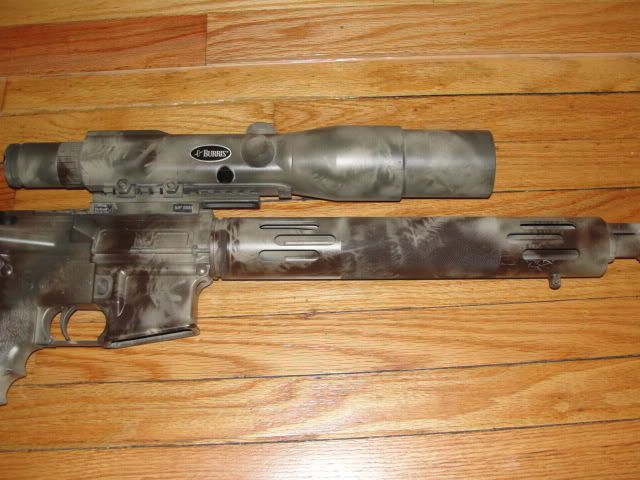
I went to WalMart and purchased the 3 cans of paint; Tan, Olive and Dark Brown. I did my Armalite first. I disassembled the upper from the lower, removed the VTac forend, took off the compensator and gas block in order to expose the stainless heavy barrel. I removed the scope with the LaRue Quick Disconnect mount.
Then I washed everything with Dawn dishwashing detergent to remove oils and dirt. I dried everything and let the sit. Then I used the primer that came with the Camo Dip Kit to prime the metal and plastic prior to using the camo paint.
You first cover the whole gun in the tan color, let that sit and dry. Then begin to lay stics, leaves, twigs, pieces of evergreen on the gun in whatever way you like. Then you spray the olive paint. Let that dry. Then pile on more stuff and spray the brown.
The whole job took about 4 hours, but I was very plesaed with the result. All it cost me was under $20.00 in paint, primer and sealer and some time.
The neat thing is that you can easily touch up an area that you want more brown or more olive. When I saw on my Varminter that I did not have enough brown, I simply took a couple of pieces of evergreen branches, held it against parts of the gun, and sprayed from about 6" to get more dark pattern.
When I was done, I sprayed the guns with a matte clear sealer, 3 coats.
Here's pics of the Armalite and then the Bushmaster Varminter that I did second.
Bushmaster Varminter is on top, Armalite AR is on bottom.
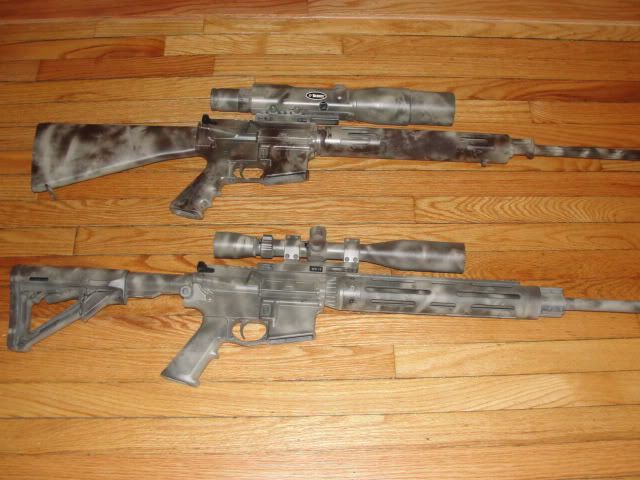
Armalite
Bushmaster Varminter
So, I came across a good Youtube video, , that shows how to simply camo your gun.
I went to WalMart and purchased the 3 cans of paint; Tan, Olive and Dark Brown. I did my Armalite first. I disassembled the upper from the lower, removed the VTac forend, took off the compensator and gas block in order to expose the stainless heavy barrel. I removed the scope with the LaRue Quick Disconnect mount.
Then I washed everything with Dawn dishwashing detergent to remove oils and dirt. I dried everything and let the sit. Then I used the primer that came with the Camo Dip Kit to prime the metal and plastic prior to using the camo paint.
You first cover the whole gun in the tan color, let that sit and dry. Then begin to lay stics, leaves, twigs, pieces of evergreen on the gun in whatever way you like. Then you spray the olive paint. Let that dry. Then pile on more stuff and spray the brown.
The whole job took about 4 hours, but I was very plesaed with the result. All it cost me was under $20.00 in paint, primer and sealer and some time.
The neat thing is that you can easily touch up an area that you want more brown or more olive. When I saw on my Varminter that I did not have enough brown, I simply took a couple of pieces of evergreen branches, held it against parts of the gun, and sprayed from about 6" to get more dark pattern.
When I was done, I sprayed the guns with a matte clear sealer, 3 coats.
Here's pics of the Armalite and then the Bushmaster Varminter that I did second.
Bushmaster Varminter is on top, Armalite AR is on bottom.
Armalite
Bushmaster Varminter