doggin coyotes
Well-known member
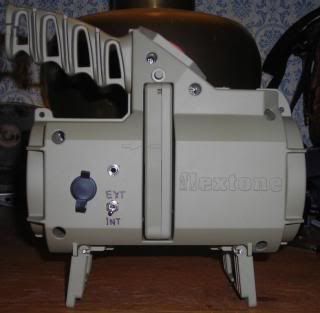
I said this before, but I'll say it again. This caller is not a piece of cake to disassemble. Just a couple of things I'll mention if you do decide to attempt it.
Remove batteries first!
Then there are are two items you need to get off before ever removing the first screw.
The metal rings for the carry strap is first. Using two pairs of pliers, twist the ends in opposite directions so there is enough opening in the rings to remove them. Then throw the damm rattling things away!
The legs are the next thing. How to remove the legs was a real head scratcher for awhile.
Hint here: At first glance it looks like you should be able to drive/push the metal pins though the legs, through the case and out the other side. Awww, ,but alas, it's not that easy! They are not one long pin as they look to be! There is not a hole that goes clear though the case halves. There are actually FOUR separate metal pins that hold the legs on. At least one of those pins in each leg needs to come out. Then with the other pin still in the leg, you can twist, pull and manipulate the plastic leg to get it off the caller. Good luck with the leg (I should say pin) removal. It was the most challenging part of the entire project.

NOW, you can remove all the screws.
Next, use a butter knife to slowly, gently start separating the case halves. GO CAREFULLY, SLOWLY, GENTLY. Remember that good sealer I mentioned? It also does a very good job of gluing everything together! Also be careful so you don't mess up the rubber gasket in the process. On my caller, part of the gasket wanted to stay with the left side of the case and part wanted to stay with the right. Before you get the cases separated to far (less than 1/4"), decide which side you want that gasket to stay with and carefully use the butter knife (maybe a small screw driver, etc) to *help* the gasket stay with that side. That good sealer makes this a challenge in some places! It's GOOD STUFF.. lol
Hint #2: As you are separating the case, try and persuade both speakers and the button control pad to stay with the RIGHT side of the case (right side meaning opposite side as battery compartment).. This way all you have to worry about in the left side of the case is the two wires going to the battery compartment (makes things a little easier)..
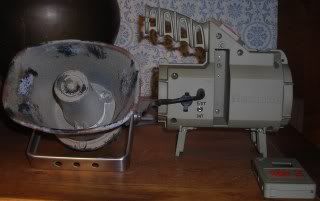
OK, now you can carefully work the speaker out of the right case half and remove the rubber ring which will free the grill. YEAH!!
(Note here: the antenna wire (just a bare copper wire) on mine was taped to the side of the speaker and kinda ran under it. Don't know if all the callers would be this way or not. If yours is, I would suggest un-taping the wire and gently, carefully get it out of the way while you're messing with the speaker. Be careful and don't break it off of the circuit board! Before I reassembled, I re-routed that antenna wire upward to the highest point possible inside the caller. You can do that if'n you want to or not. May not make a bit of difference.)
Which brings you to one more slight dilemma. Now without the grill in the rubber speaker ring the speaker will be very loose in the rubber and will flop around. Not to mention it won't seal good when you put it all back together.
You will want to do something to make up for the approx thickness of the now missing grill and take up the extra space that is now in the rubber speaker ring. I at first used a thin piece of nylon twine and worked it down between the rubber and the speaker lip. That would of worked just fine, as would of a piece of thin insulated electrical wire or any number of other things or ways a guy could of come up with.
I then thought of a rubber O ring. I scrounged around through my O ring assortment and found one about the same diameter as the grill and just a touch thicker. Worked fantastic!
Well that's about it. Reassemble and hopefully it all still works.
There ARE a few challenges to this little modification. But that's what makes it fun.

Remove batteries first!
Then there are are two items you need to get off before ever removing the first screw.
The metal rings for the carry strap is first. Using two pairs of pliers, twist the ends in opposite directions so there is enough opening in the rings to remove them. Then throw the damm rattling things away!
The legs are the next thing. How to remove the legs was a real head scratcher for awhile.
Hint here: At first glance it looks like you should be able to drive/push the metal pins though the legs, through the case and out the other side. Awww, ,but alas, it's not that easy! They are not one long pin as they look to be! There is not a hole that goes clear though the case halves. There are actually FOUR separate metal pins that hold the legs on. At least one of those pins in each leg needs to come out. Then with the other pin still in the leg, you can twist, pull and manipulate the plastic leg to get it off the caller. Good luck with the leg (I should say pin) removal. It was the most challenging part of the entire project.
NOW, you can remove all the screws.
Next, use a butter knife to slowly, gently start separating the case halves. GO CAREFULLY, SLOWLY, GENTLY. Remember that good sealer I mentioned? It also does a very good job of gluing everything together! Also be careful so you don't mess up the rubber gasket in the process. On my caller, part of the gasket wanted to stay with the left side of the case and part wanted to stay with the right. Before you get the cases separated to far (less than 1/4"), decide which side you want that gasket to stay with and carefully use the butter knife (maybe a small screw driver, etc) to *help* the gasket stay with that side. That good sealer makes this a challenge in some places! It's GOOD STUFF.. lol
Hint #2: As you are separating the case, try and persuade both speakers and the button control pad to stay with the RIGHT side of the case (right side meaning opposite side as battery compartment).. This way all you have to worry about in the left side of the case is the two wires going to the battery compartment (makes things a little easier)..
OK, now you can carefully work the speaker out of the right case half and remove the rubber ring which will free the grill. YEAH!!
(Note here: the antenna wire (just a bare copper wire) on mine was taped to the side of the speaker and kinda ran under it. Don't know if all the callers would be this way or not. If yours is, I would suggest un-taping the wire and gently, carefully get it out of the way while you're messing with the speaker. Be careful and don't break it off of the circuit board! Before I reassembled, I re-routed that antenna wire upward to the highest point possible inside the caller. You can do that if'n you want to or not. May not make a bit of difference.)
Which brings you to one more slight dilemma. Now without the grill in the rubber speaker ring the speaker will be very loose in the rubber and will flop around. Not to mention it won't seal good when you put it all back together.
You will want to do something to make up for the approx thickness of the now missing grill and take up the extra space that is now in the rubber speaker ring. I at first used a thin piece of nylon twine and worked it down between the rubber and the speaker lip. That would of worked just fine, as would of a piece of thin insulated electrical wire or any number of other things or ways a guy could of come up with.
I then thought of a rubber O ring. I scrounged around through my O ring assortment and found one about the same diameter as the grill and just a touch thicker. Worked fantastic!
Well that's about it. Reassemble and hopefully it all still works.
There ARE a few challenges to this little modification. But that's what makes it fun.